


Why Enamel Jewelry Restoration Matters for Your Treasured Pieces
Enamel jewelry restoration is the process of repairing chips, cracks, fading, or missing sections of colored enamel on metal jewelry — and it can bring a beloved piece back to life.
Here's a quick look at your main restoration options:
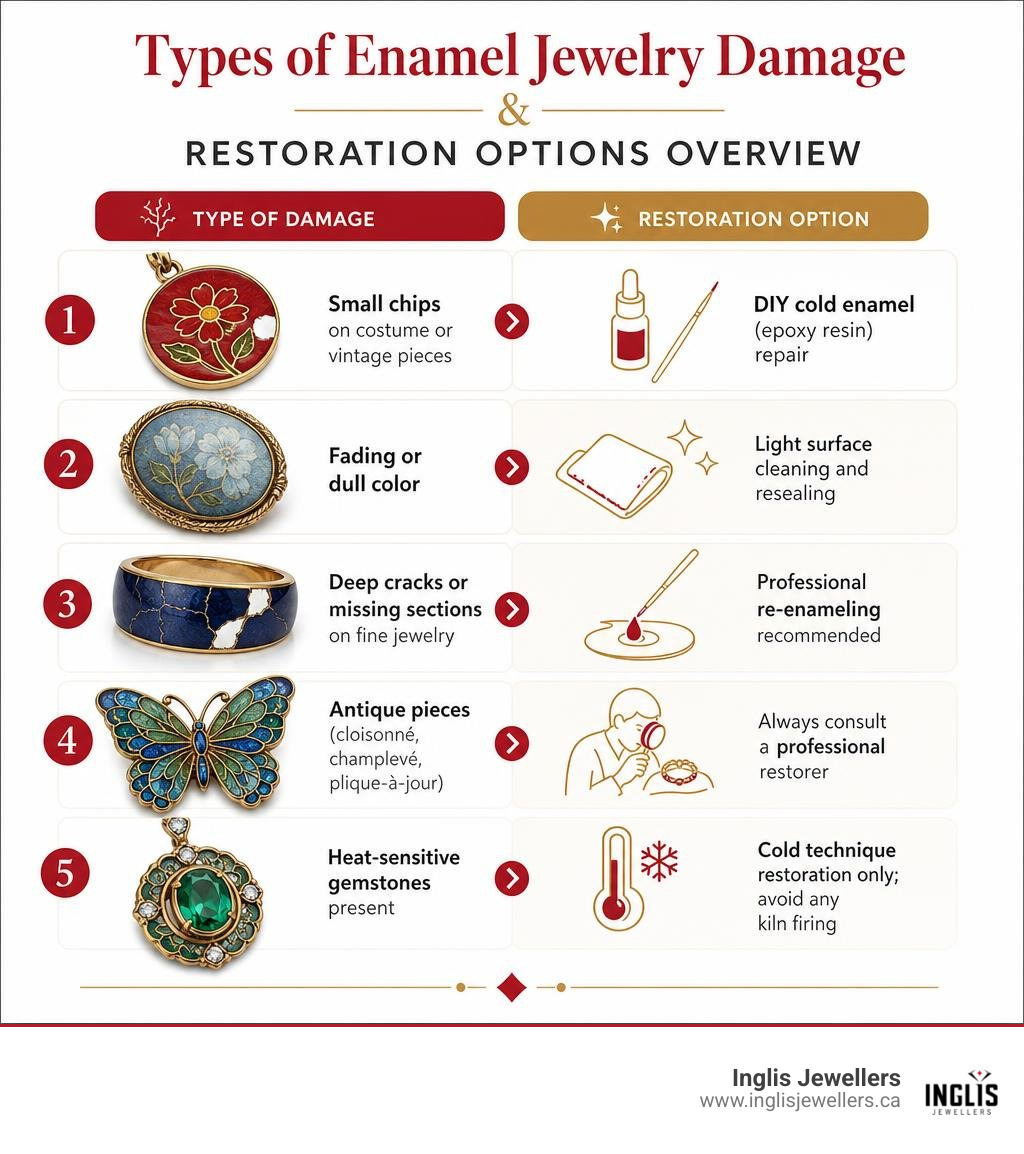
- Small chips on costume or vintage pieces — DIY cold enamel (epoxy resin) repair is often suitable
- Fading or dull color — Light surface cleaning and resealing may be enough
- Deep cracks or missing sections on fine jewelry — Professional re-enameling is recommended
- Antique pieces (cloisonné, champlevé, plique-à-jour) — Always consult a professional restorer
- Heat-sensitive gemstones present — Cold technique restoration only; avoid any kiln firing
Enamel jewelry is remarkably durable — until it isn't. A knock against a hard surface, a sudden temperature change, or simply decades of wear can leave chips, cracks, or dull patches where vibrant color once lived. Vintage brooches, heirloom rings, Art Deco pendants — these pieces carry real history, and damage can feel devastating.
The good news? Most enamel damage is fixable. Whether you're dealing with a small chip on a charity-shop find or a cracked section on a cherished family heirloom, there's a restoration path that suits your piece and your budget.
What matters most is choosing the right approach from the start. The wrong technique — or the wrong materials — can cause permanent damage that's far worse than the original chip.
This guide walks you through everything you need to know: how enamel works, what causes damage, when DIY is a smart option, and when your piece deserves expert hands.
At Inglis Jewellers, we've helped countless customers rescue their most treasured pieces, and we're here to help you make the right call for yours.
Understanding Enamel Types and Common Damage
To understand how enamel jewelry restoration works, it helps to first understand what enamel actually is. Enamel is not paint, nor is it a simple surface glaze. Historically and technically, true enamel is glass powder fused to a metal substrate under immense heat. However, in modern jewelry making and repair, two distinct classes of enamel dominate the landscape: traditional vitreous enamel and modern cold enamel.
Damage to enamel jewelry generally stems from three primary culprits:
- Physical Impact: Because glass is rigid and unforgiving, dropping a ring on tiled flooring or knocking a brooch against a stone counter creates high localized stress. This leads to sharp chips, surface fractures, or loss of entire enamel sections.
- Thermal Shock: Metals expand and contract at different rates than glass when exposed to sudden temperature changes. Rapid thermal shifts cause micro-cracks known as "crazing" or break the bond between the enamel and the underlying metal structure.
- Age-Related Degradation & Wear: Decades of exposure to skin oils, household chemicals, sunlight, and air pollutants can dull the surface sheen, cause yellowing in older synthetic coatings, or compromise delicate wire cells in antique pieces.
Different enameling techniques present unique challenges during restoration:
- Cloisonné: Utilizes fine gold, silver, or copper wires to form individual compartments (cloisons) filled with colored glass.
- Champlevé: Involves carving, etching, or casting recessed troughs into the base metal, which are then filled with glass paste.
- Plique-à-Jour: A jaw-dropping backless technique where enamel sits within an open metal framework, functioning like a stained-glass window that lets light pass directly through.
- Guilloché: Features transparent enamel fused over intricate, machine-engraved geometric patterns in the underlying precious metal.
Understanding these techniques is vital because a repair method that works perfectly on a simple flat medallion could permanently ruin a backless plique-à-jour earring or obscure the delicate engine-turned engraving of a guilloché piece. For a broader overview of restoring historical items, explore our guide on Antique Jewellery Repair.
Vitreous Glass vs. Cold Resin in Enamel Jewelry Restoration
When undertaking enamel jewelry restoration, choosing between vitreous glass and cold enamel resin is the single most critical decision you will make.
Vitreous enamel is authentic glass powder (ground silica, flux, and metal oxides) applied to non-ferrous metals like gold, silver, or copper and fired in a kiln at extreme temperatures—typically between 750°C and 850°C (1,382°F to 1,562°F), and sometimes higher depending on the oxide formula. Firing fuses the powdered glass into a smooth, impervious surface bonded to the metal.
Cold enamel, by contrast, relies on high-grade two-part epoxy or acrylic resins mixed with lightfast pigments. Instead of heat, it cures chemically over 24 to 72 hours at room temperature. Cold resin provides superior adhesion to previously finished pieces and presents zero risk of thermal shock to adjacent metalwork or heat-sensitive gemstones.
| Feature | Vitreous Glass Enamel | Cold Resin Enamel |
|---|---|---|
| Material Composition | Powdered glass, silica, & metal oxides | Two-part epoxy or acrylic polymer resin |
| Application Process | Kiln or torch fired (750°C–850°C / 1,382°F–1,562°F) | Room-temperature chemical curing (24–72 hours) |
| Hardness & Durability | Extremely high (scratch & heat resistant) | Moderate (durable, but susceptible to scratching over time) |
| Risk to Surrounding Metal | High (risk of metal distortion or solder melting) | None (zero thermal stress) |
| Gemstone Compatibility | Safe only with un-set or extreme heat-tolerant stones | Safe with all gemstones, pearls, and soft organic materials |
| Reversibility | Difficult; requires complete stripping & re-firing | Highly reversible using targeted solvent applications |
| Best Used For | Fine gold/silver heirlooms, museum conservation | Vintage costume pieces, DIY repairs, complex gem-set items |
As detailed in art and jewelry enamel conservation standards, skilled conservators often prefer cold resin techniques for restoring antique items precisely because it preserves original historical material without subjecting fragile metalwork to destructive re-firing.
Essential Step-by-Step Enamel Jewelry Restoration Process
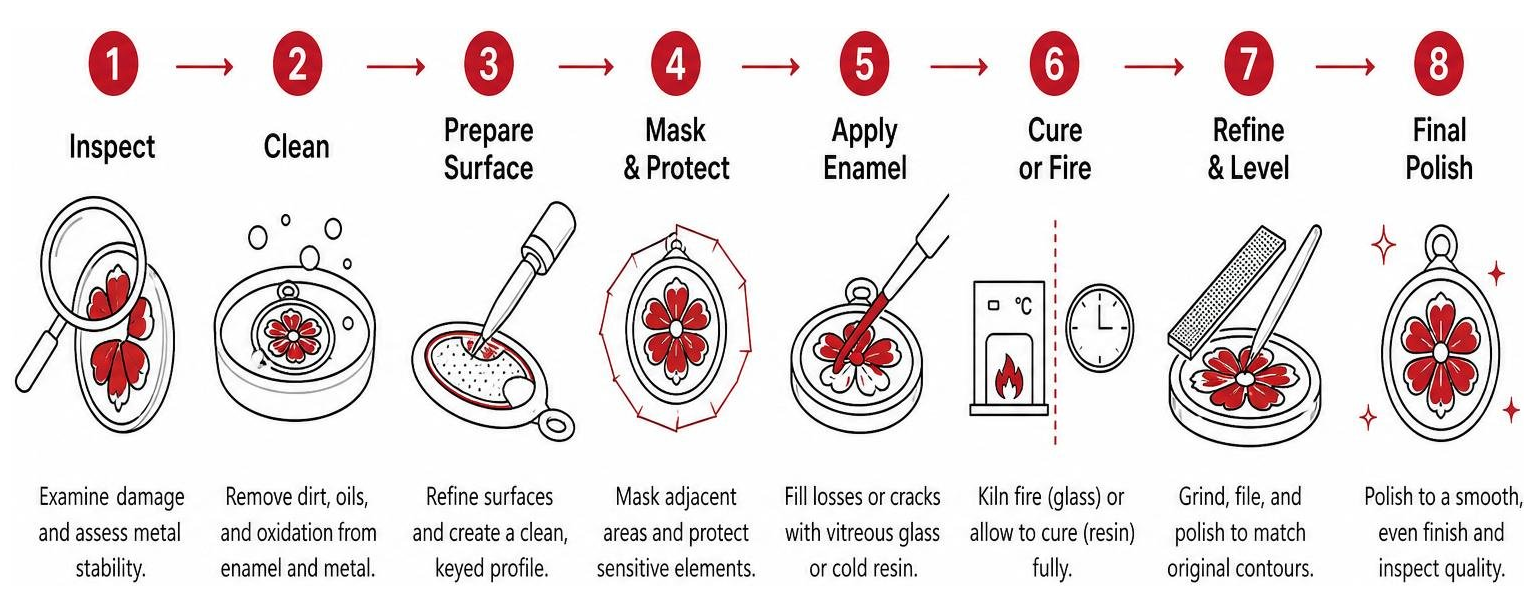
Whether performed at a bench in our goldsmith gallery or at your home workshop table, a successful restoration follows a structured, multi-stage workflow.
Surface Preparation and Metal Cleaning
Proper surface preparation is 90% of the secret to a flawless, long-lasting repair. Fresh enamel—whether glass or resin—will never bond securely to tarnished, greasy, or oxidized metal.
- Damage Assessment & Non-Invasive Testing: Inspect the piece under 10x magnification to evaluate crack depth, metal stability, and previous solder repairs. Perform non-invasive testing (such as magnetic testing or streak testing on touchstones) to confirm metal composition.
- Old Enamel Removal: Any loose, flaking, or crumbling original enamel within the damaged zone must be carefully flaked away using fine dental picks or steel needle files. Leaving unstable original enamel underneath guarantees future structural failure.
- Mechanical Abrasion: To ensure maximum mechanical adhesion, gently scuff the bare exposed metal recess with 400-to-600 grit abrasive paper or tiny needle files. This creates microscopic grooves (tooth) for the repair material to grip.
- Degreasing: Clean the prepared area meticulously using isopropyl alcohol (99%) applied with a lint-free swab. Never touch the degreased metal recess with bare fingers afterward, as natural skin oils will compromise the adhesive bond.
Color Matching and Application Techniques
Color matching is where technical skill meets artistic flair. Antique enamel colors were mixed using natural mineral oxides that can be challenging to replicate with modern off-the-shelf pigments.
- Creating the Base: When repairing translucent shades (like ruby reds, amber yellows, or emerald greens) over dark or tarnished metal, apply a paper-thin white base coat first. This prevents the underlying dark metal from dulling the vibrant top coat.
- Pigment Blending: When working with cold epoxy resins, add dry resin pigments or specialized liquid tints one drop at a time using a wooden cocktail stick. Remember: it is always far easier to darken a pale mix than it is to lighten a shade that has turned too dark.
- Precise Application: Use a fine-tipped needle or toothpicks to transfer tiny drops of mixed enamel directly into the recessed repair area. Allow natural capillary action and surface tension to pull the liquid into corners.
- Creating a Meniscus: Slightly overfill the recess so the liquid forms a tiny convex dome (meniscus). As cold resin cures, it shrinks slightly; overfilling compensates for this shrinkage, ensuring a perfectly level finish once fully cured.
- Bubble Elimination: If microscopic air bubbles appear on the surface during application, gently prick them with a fine sewing needle or pass a gentle heat source (like a warm air blower held at a distance) over the surface to pop trapped bubbles before curing begins.
For complementary guidance on handling non-enamel vintage pieces, read our resource on Costume Jewelry Restoration.
DIY Enamel Repair vs. Professional Restoration
Deciding whether to attempt a DIY fix or send your piece to a professional comes down to three factors: the monetary value of the piece, sentimental importance, and structural complexity.
Tools and Materials Needed for DIY Cold Enamel Repair
If you are restoring a low-stakes item, such as a vintage costume brooch or a flea-market silver ring, DIY cold enamel repair is an accessible, satisfying project.
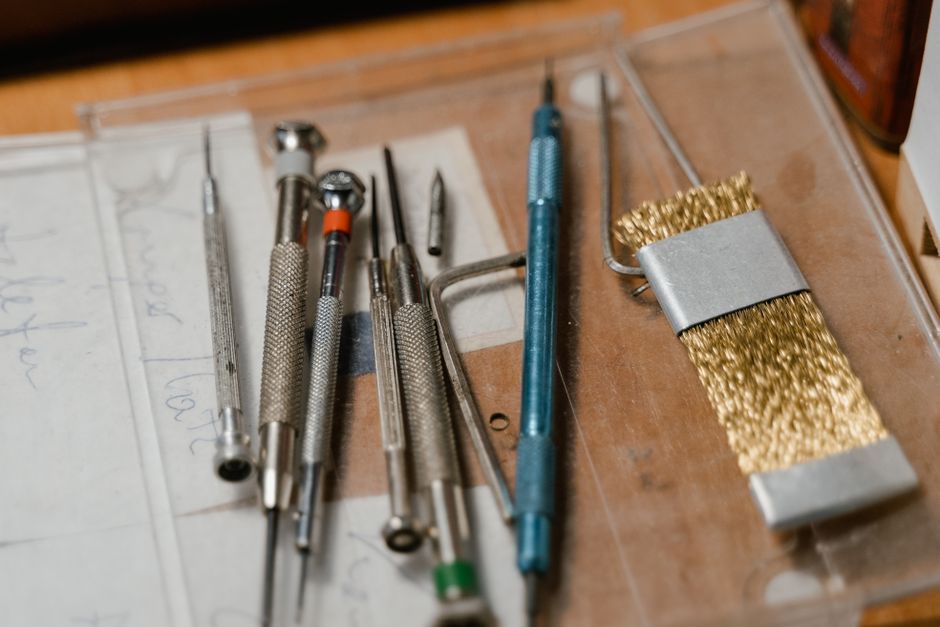
Here is the ultimate toolkit you will need:
- Two-part liquid epoxy resin (clear, non-yellowing jeweler's grade formulation)
- Concentrated resin pigments or mica powders (to match the original shade)
- 99% Isopropyl alcohol & lint-free cotton swabs (for deep surface degreasing)
- 400–600 grit abrasive sandpaper & 1000–1200 grit micro-mesh pads (for prep and finishing)
- Fine needle files and dental picks (for clearing loose debris)
- Nitrile gloves, safety glasses, and a well-ventilated workspace
- Wooden toothpicks or cocktail sticks (for stirring and precision application)
- A dust cover (such as an overturned plastic container or clean box to shield the curing resin)
When to Seek Professional Enamel Jewelry Restoration
Certain pieces should never be subjected to amateur DIY attempts. Seek out professional goldsmiths and enamel conservators under the following circumstances:
- High-Value Fine Jewelry: Gold or platinum rings, designer pieces, or historical family heirlooms where amateur repairs could destroy collector value.
- Complex Techniques: Champlevé, cloisonné, guilloché, or plique-à-jour items that require specialized wire replication or complex glass blending.
- Heat-Sensitive Gemstones: Pieces featuring emeralds, opals, pearls, turquoise, or cameos sitting directly adjacent to damaged enamel zones.
- Structural Metal Damage: Brooches or pendants with broken clasps, bent settings, or cracked shanks alongside damaged enamel.
Professional workshops utilize specialized equipment—such as micro-laser welders, high-powered 10x stereo inspection loupes, and digital-temperature kilns—to restore damaged items while safeguarding surrounding original elements. For specialized repair services, explore our Goldsmith Studio offerings.
Turnaround Time, Costs, and Post-Restoration Care
Understanding what to expect in terms of turnaround time and pricing helps set realistic expectations when booking professional restoration.
According to standard industry restoration practices, pricing and timelines depend on clear, quantifiable metrics:
- Turnaround Time: Professional restoration typically takes between 10 to 20 business days. This window allows for careful initial assessment, metal prep, precise color matching, multi-layer curing or firing, hand polishing, and final quality control.
-
Cost Structures: Professional base services generally start around $35 to $50 for simple single-location touch-ups on base metals. Final pricing increases based on:
- Number of distinct colors: (typically an additional $10–$20 per distinct color pigment)
- Number of locations: (additional charges for multiple separate damaged cells)
- Surface area size: Categorized into Small ($\le$1 inch), Medium (1–2 inches), or Large ($>$2.5 inches).
- Valuable Fine Jewelry / Vitreous Refiring: High-value antique gold or museum-grade restorations requiring vitreous re-firing or stone unsetting can range from $150 to $500+.
Essential Post-Restoration Care Tips
Once your restored piece is back in your hands, properly caring for it ensures the repair remains invisible and stable for decades:
- Avoid Extreme Chemical Exposure: Keep enamel jewelry far away from hairsprays, perfumes, chlorine pools, household bleach, and hand sanitizers.
- Never Use Ultrasonic Cleaners: Ultrasonic vibrations can shake cold resin fills loose or shatter delicate glass enamel cells in older pieces. Clean gently using warm water, mild dish soap, and a soft microfiber cloth.
- Smart Storage: Store enameled items individually in soft cloth pouches or velvet-lined boxes. Include anti-tarnish strips to protect silver and gold bases from oxidation.
- Mind the Wear: Put enamel jewelry on last when dressing and take it off first when arriving home to prevent accidental knocks against hard surfaces.
For full maintenance recommendations, explore our Jewellery Repairs Complete Guide.
Frequently Asked Questions about Enamel Restoration
Can nail polish be used to touch up chipped enamel?
While it might seem like a quick, cheap fix, nail polish should never be used for enamel jewelry repair. Nail polish lacks the chemical adhesion required to bond permanently to metal. Within weeks, atmospheric moisture and skin oils cause nail polish to shrink, yellow, peel, and flake away.
Furthermore, nail polish solvents can react poorly with older original enamels or underlying metal coatings, leaving behind stubborn residues that make subsequent professional restoration much more difficult and costly. Always opt for dedicated two-part jeweler's epoxy resin instead.
How long does a cold enamel repair last on vintage jewelry?
When performed with proper surface preparation (scuffing the metal, deep degreasing) and high-quality non-yellowing epoxy resin, a cold enamel repair can easily last 10 to 15 years or more.
Longevity depends heavily on how the item is worn. Low-impact pieces like brooches, pendants, and earrings can maintain their pristine appearance indefinitely. High-contact pieces like daily-wear dress rings or cufflinks may show minor surface scratches over time, but these can usually be buffed and polished back to a high gloss without needing a complete overhaul.
How do jewelers protect heat-sensitive gemstones during re-enameling?
High-heat kiln firing (750°C–850°C) will shatter or destroy soft organic gemstones (pearls, coral, cameos) and heat-sensitive minerals (emerald, opal, turquoise, tanzanite). To protect these delicate elements during enamel jewelry restoration, professional jewelers employ three distinct strategies:
- Unsetting the Gems: Before any high-heat kiln work or laser soldering takes place, bench jewelers carefully unset all heat-sensitive stones, replacing them only after the metal and glass work is complete.
- Thermal Shielding & Protective Films: For minor localized repairs, jewelers apply heat-absorbing thermal pastes or protective liquid masking films over adjacent metalwork and durable stones to block heat transfer.
- Cold Technique Conservation: When unsetting stones carries too high a risk of breaking delicate vintage prongs, conservators pivot entirely away from hot kiln firing, using cold-cure epoxy resin techniques as recommended by industry conservation specialists.
Conclusion
Vintage enamel jewelry represents a marvelous intersection of metalworking, fine art, and history. While seeing a chip or crack in a favorite piece can be disheartening, modern enamel jewelry restoration techniques mean that damage rarely has to mark the end of your piece's story.
From simple DIY cold resin touch-ups on costume brooches to master-level conservator restorations on priceless gold heirlooms, choosing the right method preserves both the beauty and the financial value of your treasured item.
If you have a damaged enamel ring, pendant, or brooch resting in your jewelry box, don't leave it hidden away. Visit us at Inglis Jewellers across Atlantic Canada—with convenient locations in Truro, New Glasgow, Sydney, NS, and Riverview, NB. Our experienced bench goldsmiths are always ready to assess your piece, discuss your options, and bring your favorite jewelry back to brilliant life.
For complete details on all our maintenance and restoration capabilities, visit our comprehensive Jewellery Repairs Complete Guide.