


When Beads Break: What You Need to Know About Bead Jewelry Repair
Bead jewelry repair is the process of restoring broken, worn, or damaged beaded pieces — from restringing snapped necklaces to replacing missing beads, fixing clasps, and reknotting pearls.
Here's a quick overview of the most common bead jewelry repairs:
- Restringing — replacing worn or broken thread, wire, or cord
- Pearl knotting — tying knots between each bead to prevent wear and keep beads secure
- Clasp replacement — swapping out broken or outdated hardware
- Missing bead replacement — sourcing matching beads to restore the original look
- Rhinestone or stone re-gluing — re-setting loose or fallen stones
- Elastic replacement — re-stringing stretch bracelets on fresh cord
Whether it's a pearl strand passed down through generations or a beaded bracelet you wear every day, a broken piece doesn't have to mean a lost piece. Most repairs are straightforward — and many can be done at home with the right materials and a little patience.
That said, some jobs are better left to a professional jeweler, especially when fine pearls, precious gemstones, or intricate weaving are involved.
This guide walks you through both: what you can fix yourself, and when to bring it in.
Common Problems Solved by Bead Jewelry Repair
We have all been there. You are getting ready for a night out, you reach for your favorite beaded necklace, and—snap—suddenly there are beads bouncing off the hardwood floor like tiny, chaotic pinballs. It is a heartbreaking moment, but it is also incredibly common.
Over time, even the most beautifully crafted beaded jewelry experiences wear and tear. Recognizing the early warning signs of jewelry fatigue can save you from losing precious materials.
Restringing and Knotting
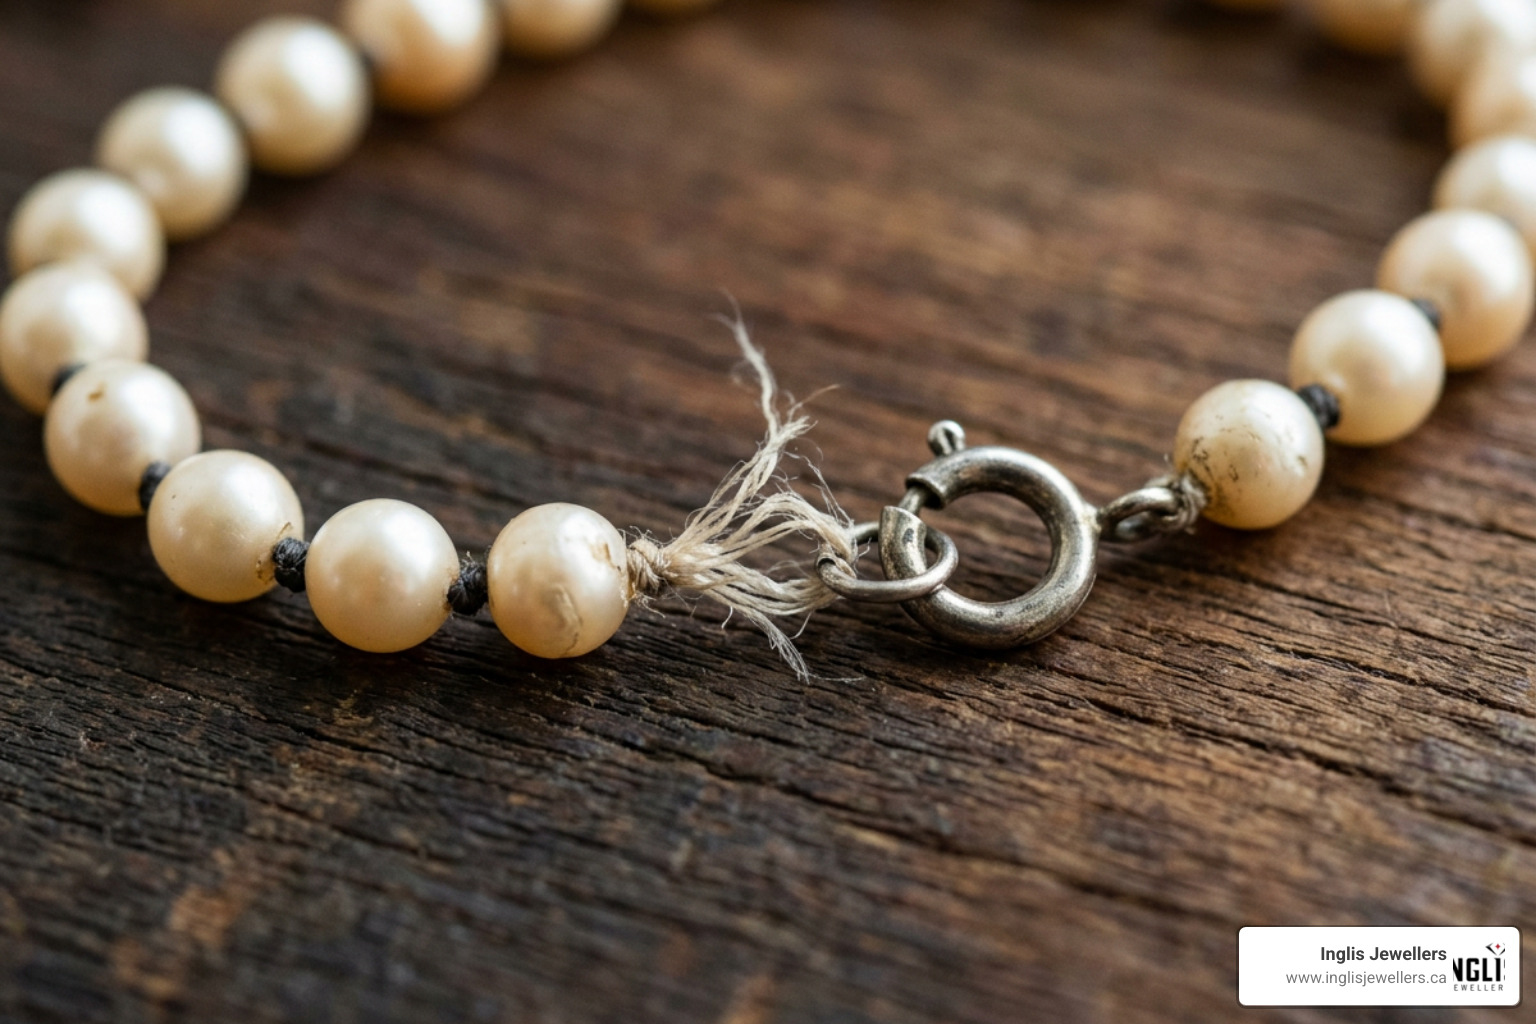
The most frequent culprit behind a broken necklace or bracelet is the degradation of the stringing material. Frayed silk, stretched elastic, and thinning wire are inevitable side effects of loving your jewelry.
As silk thread ages, it absorbs moisture, skin oils, and cosmetics, causing it to stretch and weaken. If you notice gaps between your beads where the thread is visible, or if the thread looks fuzzy or discolored near the clasp, it is time for a restringing.
For valuable pieces like pearls, restringing is recommended every 1 to 2 years to maintain durability. If you are dealing with a family heirloom that has sat in a jewelry box for decades, professional intervention is key to preserving its integrity. You can learn more about restoring these precious links to the past in our guide to Antique Jewellery Repair.
Clasp Replacement and Hardware Upgrades
Another weak point in beaded jewelry is the hardware. Clasps are mechanical devices that get opened and closed thousands of times. Eventually, the tiny springs inside lobster claws or spring rings break, leaving them stuck open or unable to secure tightly.
Magnetic clasps can lose their strength, and basic base-metal clasps can tarnish or cause skin irritation. Replacing a clasp is one of the easiest ways to breathe new life into an old piece of jewelry. Upgrading to high-quality sterling silver or 14K gold clasps not only ensures your necklace stays securely around your neck but also elevates the overall value and aesthetic of the piece.
Materials and Techniques for Restringing Beads
Choosing the right stringing material is the foundation of any successful bead jewelry repair. The correct choice depends entirely on the weight of the beads, the size of their drill holes, and how the jewelry is worn.
| Material | Best Used For | Pros | Cons |
|---|---|---|---|
| Silk Thread | Pearls, light gemstones, delicate glass beads | Luxurious drape, traditional look, allows for tight knotting | Can stretch over time, susceptible to moisture damage |
| Flexible Wire | Heavy gemstones, metal beads, sharp-edged beads | Extremely strong, resists cutting, easy to finish with crimps | Less fluid drape than silk, cannot be knotted |
| Elastic Cord | Everyday stretch bracelets, casual beadwork | Easy to put on, no clasp required, budget-friendly | Degrades from heat and body oils, can snap unexpectedly |
Choosing the Right Thread for Bead Jewelry Repair
For classic pearl necklaces and lightweight gemstone strands, silk thread is the undisputed gold standard. Silk provides a beautiful, fluid drape that allows the jewelry to contour naturally against your body.
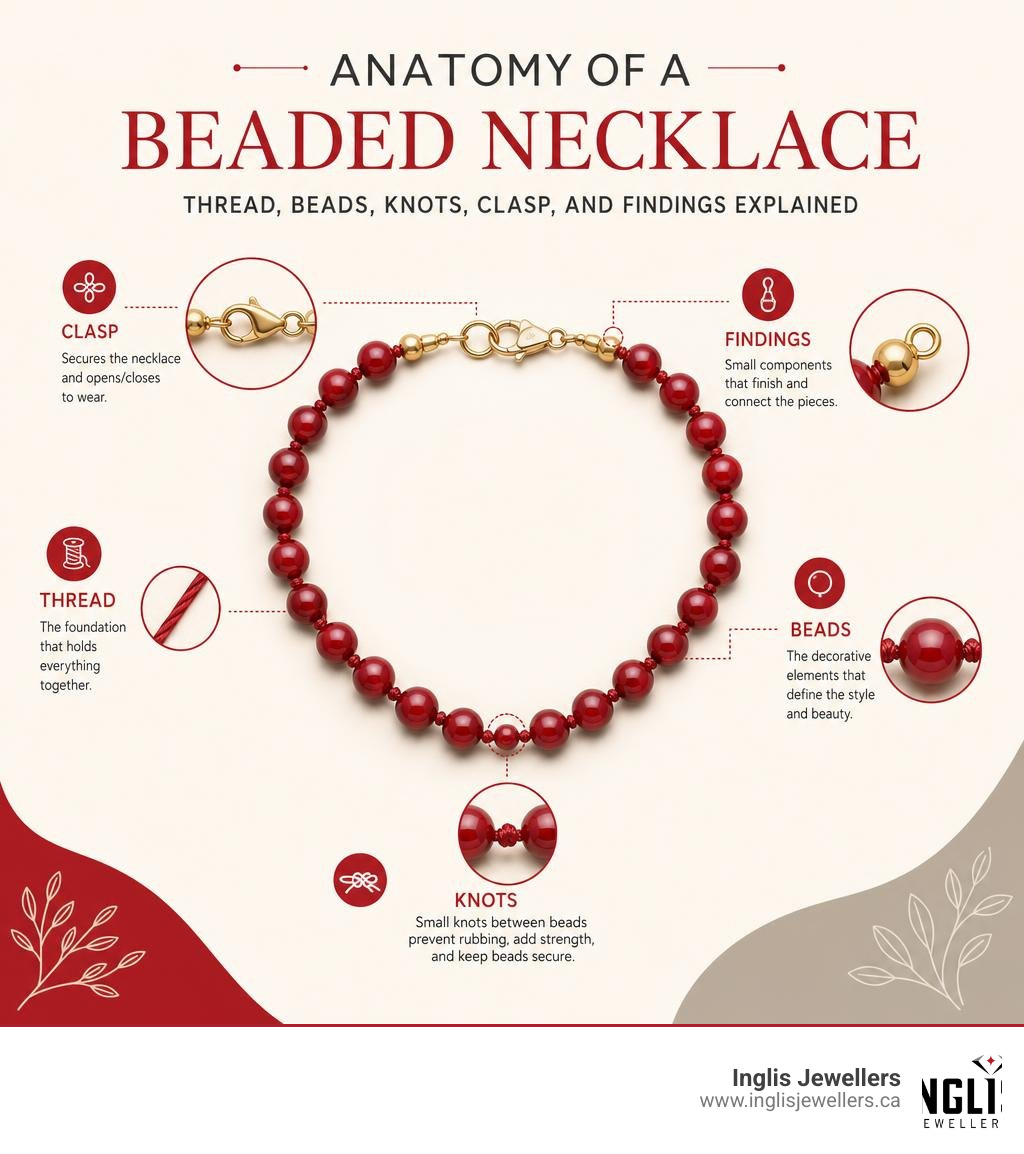
The traditional technique of pearl knotting—placing a small, tight knot between every single bead—serves two critical purposes:
- It prevents the beads from rubbing against one another, which can wear away the delicate nacre of pearls.
- If the strand ever breaks, only one single bead will fall off, saving the rest of your precious collection from scattering.
When repairing high-end strands, professionals often use premium German silk thread. This material is incredibly strong and pre-stretched, ensuring your necklace maintains its perfect length without sagging over time.
Flexible Wire and Crimp Beads
If you are repairing a necklace made of heavy gemstone beads, chunky glass, or beads with sharp edges (like metal spacers or unfinished crystals), silk thread will quickly slice under the pressure. Instead, you need a nylon-coated, flexible stainless steel wire, such as Beadalon or Flex-Rite.
These wires consist of multiple micro-strands of steel woven together and coated in smooth nylon. They are incredibly strong and virtually impossible to cut without heavy-duty wire cutters. Because you cannot tie knots in steel wire, these designs are finished using tiny metal tubes called crimp beads. These are slid onto the wire, looped through the clasp, and crushed flat with crimping pliers to lock the wire in place. Crimp covers are then placed over the flattened metal to create a polished, professional look.
Elastic Cord for Stretch Bracelets
Stretch bracelets are incredibly popular because they are comfortable and easy to slip on and off without fumbling with a clasp. However, elastic cord degrades over time due to exposure to sunlight, hand sanitizers, soaps, and body oils.
When repairing a stretch bracelet, look for a high-quality, multi-strand elastic cord. To finish a stretch bracelet securely, we recommend using a surgeon's knot, which is a modified square knot with an extra pass for security. To ensure the knot never works its way loose, apply a tiny dab of jewelry-grade epoxy or clear cement to the knot before tucking it inside the nearest bead hole.
Step-by-Step Guide: How to Restring a Beaded Necklace
If you have a simple, non-valuable beaded necklace that needs a fresh start, tackling the repair at home is a fun and rewarding weekend project.
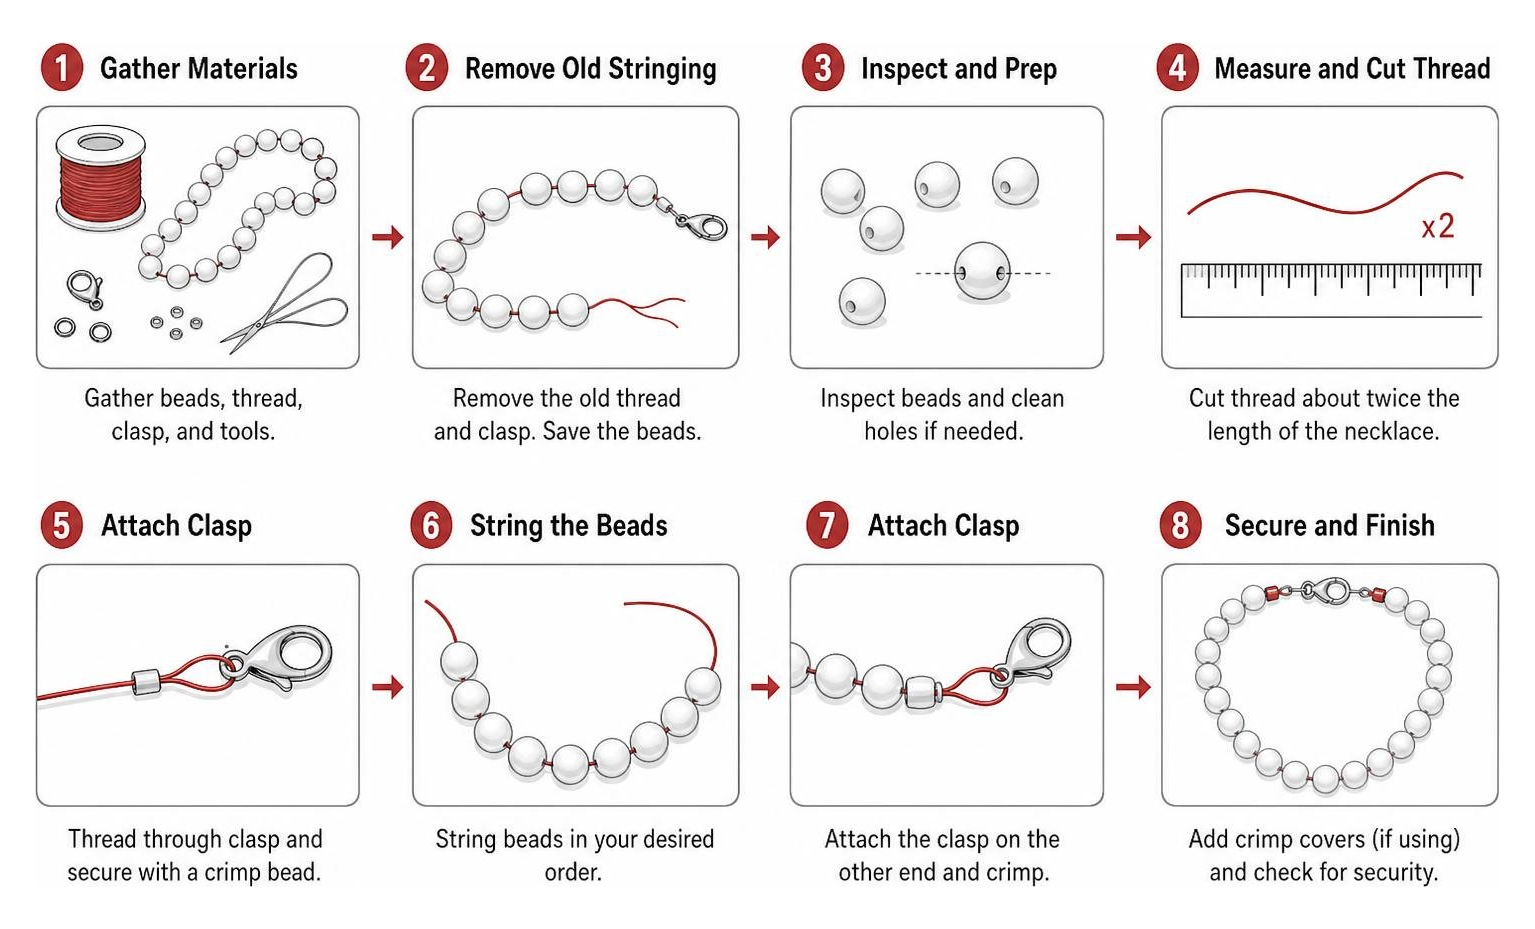
Step 1: Preparing Your Workspace and Materials
Before you cut the old thread, clear a clean, flat workspace away from pets, drafts, and curious children.
We highly recommend using a flocked bead board. The soft, velvet-like surface keeps your beads from rolling away, and the built-in U-shaped channels allow you to layout your design and measure its length before you start stringing.

Gather your tools:
- A bead board or a soft bead mat
- Fine jewelry scissors or flush cutters
- Your stringing material (such as nylon-coated wire)
- Two crimp beads and two crimp covers
- Your chosen clasp
- Chain-nose pliers and crimping pliers
Step 2: Laying Out and Stringing the Beads
Carefully cut the old necklace apart, keeping the beads in their original order on your bead board. This is especially important if the necklace has a graduated design (where the beads get progressively larger toward the center) or a complex pattern.
Inspect the beads as you lay them out. Wipe away any dirt or dust with a soft, damp microfiber cloth. If you notice any missing or cracked beads, now is the time to source replacements or adjust the pattern symmetrically to accommodate the change. Once your layout is perfect, begin threading your beads onto your wire or thread one by one.
Step 3: Securing the Clasp and Finishing
Once all the beads are strung, it is time to attach the clasp.
- Slide a crimp bead onto your wire, followed by one half of your clasp.
- Loop the wire back through the crimp bead and through the first two or three beads on your strand.
- Use your crimping pliers to gently compress the crimp bead. The crimping tool has a special two-step jaw: the first notch crimps the bead into a "U" shape, separating the two wires, and the second notch folds it neatly in half.
- Pull the wire tight from the other end of the necklace, ensuring there are no gaps between your beads, but leave just enough slack so the necklace remains flexible and can curve comfortably.
- Repeat the crimping process on the second side of the clasp, trim the excess wire with flush cutters, and press crimp covers over both crimps to hide the flattened metal.
When to Seek Professional Bead Jewelry Repair
While restringing a basic glass bead necklace is a great DIY task, there are times when attempting a home repair can do more harm than good. Valuable heirlooms, delicate pearls, and complex woven structures deserve the touch of an experienced hand.
Handling Precious Pearls and Gemstones
Fine pearls are incredibly delicate. Their surfaces can be easily scratched by metal tools, and their drill holes are often microscopic. Professional pearl restringing requires specialized silk threads, tiny needles, and a highly practiced knotting technique to ensure the knots are perfectly uniform and sit flush against the pearls.
Additionally, professional jewelry workshops use ultrasonic cleaners and specialized, gentle solutions to clean pearls and gemstones safely without stripping their natural luster. If you have a broken strand of pearls, seeking a professional who understands the nuances of delicate materials is essential.
Rebuilding Settings and Complex Weaving
Some bead jewelry isn't just strung on a single wire; it is woven into intricate patterns or set directly into metal mountings. If you have an antique ring where the tiny bead-like metal prongs holding a stone in place have worn down, you are dealing with a complex technique called bead setting repair.
Rebuilding these tiny metal beads requires a master goldsmith, professional stone-setting tools, and often work under high magnification to ensure the gemstone is held securely without cracking.
At Inglis Jewellers, we take pride in our on-site goldsmithing services. Whether it is rebuilding a worn-out setting on an antique ring or reconstructing a complex woven heirloom, our team brings decades of combined expertise to every delicate task. You can learn more about our commitment to preserving your treasures by exploring Our Goldsmith Gallery Craftsmanship Custom and Care. To see how these complex bead settings are rebuilt by professionals, you can watch this Bead Setting Repair - How-To Video - Ganoksin Jewelry Making Community .
Frequently Asked Questions about Restoring Beaded Pieces
How Much Does Professional Bead Jewelry Repair Cost?
The cost of professional bead jewelry repair depends largely on the length of the strand, the size of the beads, and whether the piece requires individual knotting.
Generally, basic bead restringing (without knots) ranges from $1.00 to $2.50 per inch. For knotted designs, such as a classic pearl strand, pricing typically starts at $1.00 to $1.75 per bead, or a flat rate starting around $3.75 per inch, depending on the complexity and size of the pearls. Replacing clasps or adding new metal findings will add to the material costs.
For a complete breakdown of repair pricing and to find a trusted professional near you, check out our guide on Fine Jewelry Repair Near Me.
Can Costume Pieces Benefit from Bead Jewelry Repair?
Absolutely! Many jewelry stores refuse to touch costume or fashion jewelry because the base metals cannot be easily soldered. However, at Inglis Jewellers, we know that sentimental value has nothing to do with price tags.
We can easily restring fashion beads, replace broken clasps on costume necklaces, re-glue missing rhinestones, and convert uncomfortable clip-on earrings into pierced styles. If a piece of jewelry brings you joy, it is always worth repairing.
How Long Does a Typical Repair Take?
Most professional bead restringing and repair services are completed within 7 to 10 business days. This timeframe allows our artisans to carefully clean the beads, source any matching replacements if necessary, and meticulously restring the piece.
If your repair involves high-tech adhesives or jewelry-grade epoxies (often used to secure end-caps or re-set rhinestones), the piece may need to sit undisturbed for up to 3 days to allow the glue to fully cure and achieve maximum strength before it is safe to wear.
Conclusion
A broken strand of beads or a stretched-out bracelet doesn't belong at the bottom of a dark jewelry box. Whether you decide to tackle a simple restringing project at your kitchen table or entrust your family heirlooms to a professional, restoring your jewelry is a wonderful way to keep your favorite memories alive.
When you need a hand, Inglis Jewellers is here to help. With our trusted craftsmanship and full-service support across Atlantic Canada—including our convenient locations in Truro, New Glasgow, Sydney, and Riverview—we treat every piece of jewelry with the care and respect it deserves.
Ready to bring your broken favorites back to life? Explore our Jewellery Repairs Complete Guide to learn more about our services, or stop by one of our showrooms today to speak with our friendly team.